こんにちは!ぐちです。
タイトルはAndroidですがアイキャッチ画像はiPhoneです。笑
レイアウトとは
Androidに限らず画面を構成するボタンやテキストボックスやラベルなどを配置する方法を決めるレイアウトというパーツが用意されています。今回はAndroidで用意されているレイアウトについてご紹介したいと思います。
レイアウトの種類
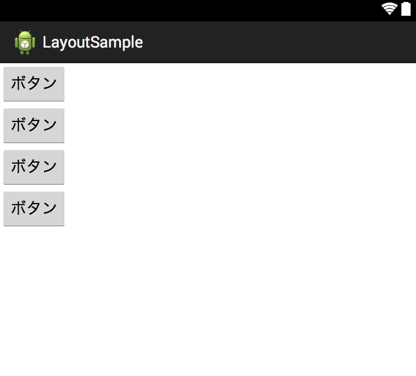
LinearLayout (vertical)
パーツを縦一列に並べて配置するレイアウトです。
コードは下記は通りです。
<LinearLayout xmlns:android="http://schemas.android.com/apk/res/android"
    xmlns:tools="http://schemas.android.com/tools"
    android:layout_width="match_parent"
    android:layout_height="match_parent"
    android:orientation="vertical" >

    <Button
        android:layout_width="wrap_content"
        android:layout_height="wrap_content"
        android:text="ボタン" />

    <Button
        android:layout_width="wrap_content"
        android:layout_height="wrap_content"
        android:text="ボタン" />

    <Button
        android:layout_width="wrap_content"
        android:layout_height="wrap_content"
        android:text="ボタン" />

    <Button
        android:layout_width="wrap_content"
        android:layout_height="wrap_content"
        android:text="ボタン" />

</LinearLayout>
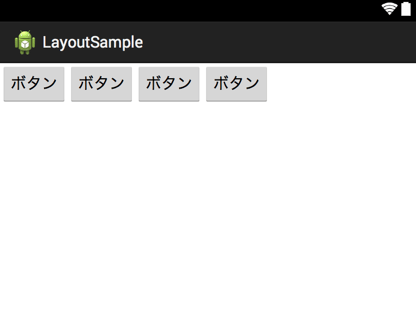
LinearLayout (horizontal)
パーツを横一列に並べて配置するレイアウトです。
コードは下記は通りです。
<LinearLayout xmlns:android="http://schemas.android.com/apk/res/android"
    xmlns:tools="http://schemas.android.com/tools"
    android:layout_width="match_parent"
    android:layout_height="match_parent"
    android:orientation="horizontal" >

    <Button
        android:layout_width="wrap_content"
        android:layout_height="wrap_content"
        android:text="ボタン" />

    <Button
        android:layout_width="wrap_content"
        android:layout_height="wrap_content"
        android:text="ボタン" />

    <Button
        android:layout_width="wrap_content"
        android:layout_height="wrap_content"
        android:text="ボタン" />

    <Button
        android:layout_width="wrap_content"
        android:layout_height="wrap_content"
        android:text="ボタン" />

</LinearLayout>
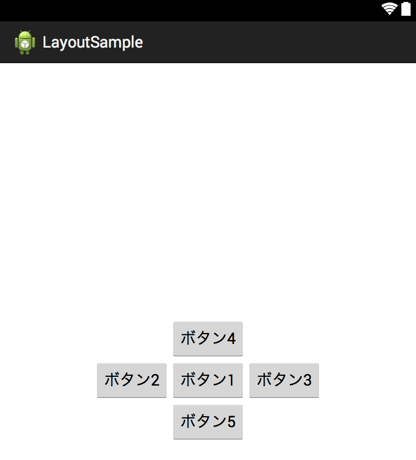
RelativeLayout
他のパーツと相対的な関係で配置するレイアウトです。「ボタン2はボタン1の左側に配置する」といった感じですね。「画面に対して中心に配置する」のようにパーツ同士でなくても想定的に指定することができます。
コードは下記は通りです。
<RelativeLayout xmlns:android="http://schemas.android.com/apk/res/android"
    xmlns:tools="http://schemas.android.com/tools"
    android:layout_width="match_parent"
    android:layout_height="match_parent"
    android:orientation="horizontal" >

    <Button
        android:id="@+id/button1"
        android:layout_width="wrap_content"
        android:layout_height="wrap_content"
        android:layout_centerInParent="true"
        android:text="ボタン1" />

    <Button
        android:layout_width="wrap_content"
        android:layout_height="wrap_content"
        android:layout_alignTop="@id/button1"
        android:layout_toLeftOf="@id/button1"
        android:text="ボタン2" />

    <Button
        android:layout_width="wrap_content"
        android:layout_height="wrap_content"
        android:layout_alignTop="@id/button1"
        android:layout_toRightOf="@id/button1"
        android:text="ボタン3" />

    <Button
        android:layout_width="wrap_content"
        android:layout_height="wrap_content"
        android:layout_above="@id/button1"
        android:layout_alignLeft="@id/button1"
        android:text="ボタン4" />

    <Button
        android:layout_width="wrap_content"
        android:layout_height="wrap_content"
        android:layout_alignRight="@id/button1"
        android:layout_below="@id/button1"
        android:text="ボタン5" />

</RelativeLayout>
FrameLayoutとTableLayout、GridLayoutは次の機会にご紹介します。