こんにちは!ぐちです。
こちらの記事(Androidのレイアウトはこうやって使いこなせ〜パート1〜【初心者向け】)でご紹介したAndroidのレイアウトの続きをご紹介しますね。例によってアイキャッチ画像はiPhoneですけどね。笑
レイアウトの種類
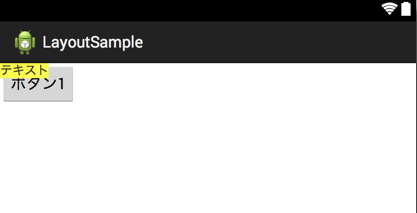
FrameLayout
複数のパーツを配置した場合にあとから配置したパーツが上に重なって配置されるレイアウトです。
コードは下記は通りです。
<FrameLayout xmlns:android="http://schemas.android.com/apk/res/android"
    xmlns:tools="http://schemas.android.com/tools"
    android:layout_width="match_parent"
    android:layout_height="match_parent"
    android:orientation="horizontal" >

    <Button
        android:id="@+id/button1"
        android:layout_width="wrap_content"
        android:layout_height="wrap_content"
        android:text="ボタン1" />

    <TextView
        android:layout_width="wrap_content"
        android:layout_height="wrap_content"
        android:background="#ffff00"
        android:text="テキスト" />

</FrameLayout>
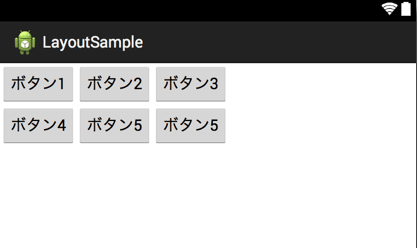
TableLayout
パーツを格子状に配置するレイアウトです。
コードは下記は通りです。
<TableLayout xmlns:android="http://schemas.android.com/apk/res/android"
    xmlns:tools="http://schemas.android.com/tools"
    android:layout_width="match_parent"
    android:layout_height="match_parent" >

    <TableRow>
        <Button
            android:id="@+id/button1"
            android:layout_width="wrap_content"
            android:layout_height="wrap_content"
            android:text="ボタン1" />

        <Button
            android:layout_width="wrap_content"
            android:layout_height="wrap_content"
            android:text="ボタン2" />

        <Button
            android:layout_width="wrap_content"
            android:layout_height="wrap_content"
            android:text="ボタン3" />
    </TableRow>

    <TableRow>
        <Button
            android:layout_width="wrap_content"
            android:layout_height="wrap_content"
            android:text="ボタン4" />

        <Button
            android:layout_width="wrap_content"
            android:layout_height="wrap_content"
            android:text="ボタン5" />

        <Button
            android:layout_width="wrap_content"
            android:layout_height="wrap_content"
            android:text="ボタン5" />
    </TableRow>

</TableLayout>
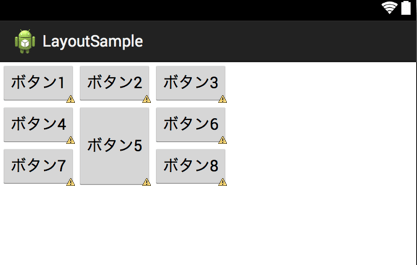
GridLayout
TableLayoutと同じくパーツを格子状に配置するレイアウトです。TableLayoutとの違いはGridLayoutは縦方向にもセルの結合ができます。
コードは下記は通りです。
<GridLayout xmlns:android="http://schemas.android.com/apk/res/android"
    xmlns:tools="http://schemas.android.com/tools"
    android:layout_width="match_parent"
    android:layout_height="match_parent"
    android:columnCount="3" >

    <Button
        android:id="@+id/button1"
        android:layout_width="wrap_content"
        android:layout_height="wrap_content"
        android:layout_column="0"
        android:layout_row="0"
        android:text="ボタン1" />

    <Button
        android:layout_width="wrap_content"
        android:layout_height="wrap_content"
        android:layout_column="1"
        android:layout_row="0"
        android:text="ボタン2" />

    <Button
        android:layout_width="wrap_content"
        android:layout_height="wrap_content"
        android:layout_column="2"
        android:layout_row="0"
        android:text="ボタン3" />

    <Button
        android:layout_width="wrap_content"
        android:layout_height="wrap_content"
        android:layout_column="0"
        android:layout_row="1"
        android:text="ボタン4" />

    <Button
        android:layout_width="wrap_content"
        android:layout_height="97dp"
        android:layout_column="1"
        android:layout_row="1"
        android:layout_rowSpan="2"
        android:text="ボタン5" />

    <Button
        android:layout_width="wrap_content"
        android:layout_height="wrap_content"
        android:layout_column="2"
        android:layout_row="1"
        android:text="ボタン6" />

    <Button
        android:layout_width="wrap_content"
        android:layout_height="wrap_content"
        android:layout_column="0"
        android:layout_row="2"
        android:text="ボタン7" />


    <Button
        android:layout_width="wrap_content"
        android:layout_height="wrap_content"
        android:layout_column="2"
        android:layout_row="2"
        android:text="ボタン9" />

</GridLayout>
これら5つ(6種類)のレイアウトを駆使すれば様々なレイアウトを実現させることができます。もちろん1つのレイアウトだけで実現できない場合も入れ子にしたりすることでクリアできるはずです。